

Imagine having a YouTube Cashcow Channel that gains millions of views by posting videos created solely using artificial intelligence (AI). It’s not just a dream—it’s a reality! I recently came across a fascinating YouTube channel that produces numerous videos in record time. These videos consist of fun facts, tips, and informative content, using AI-generated voiceovers, stock footage, and images. In this article, I will break down the process that these channels employ to create AI-generated videos, and I will show you how you can quickly produce your own YouTube videos using AI tools. So, sit back, relax, and let’s delve into the world of AI-powered content creation.
Step 1: Generating Topic Ideas with GravityWrite
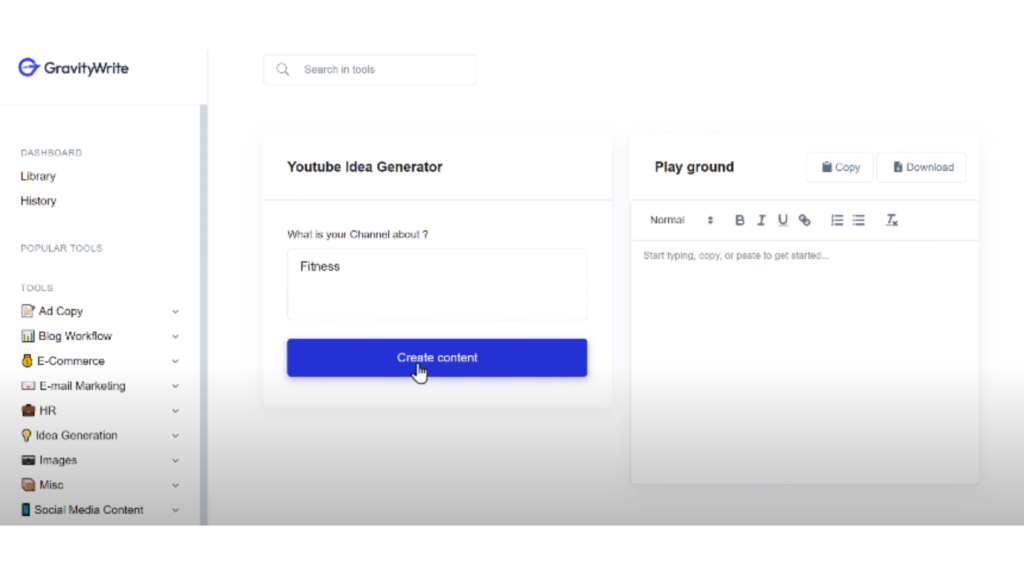
The first step is to gather topic ideas. If you already have a specific video topic in mind, you can skip to the next step. However, if you’re open to exploring various ideas, continue reading. We will utilize an AI tool called GravityWrite to generate video ideas effortlessly. Once logged in, access the YouTube tab from the vertical menu on the left. Here, you’ll find a variety of tools to aid in creating YouTube videos. Click on the YouTube Idea Generator tool and enter keywords related to your channel’s topic or niche. For example, if you’re interested in fitness, enter “fitness” and click “Create Content.” Review the generated ideas and select the one that resonates with you.
Step 2: Crafting an Engaging Title
Next, we need to create an attractive title for your video. Within GravityWrite, there is a tool specifically designed to generate captivating title ideas. Copy the selected video idea from the previous step and navigate to the Title and Thumbnail Ideas tool. Paste the idea into the tool and click “Create.” You will be presented with a range of title ideas and even thumbnail suggestions for each topic. Take your time to explore the options and choose the most appealing title. Copy it and save it for later.

Step 3: Developing the Video Script
Now, it’s time to create a script for your video. A well-crafted script will serve as the foundation for both the visuals and audio components of your video. Luckily, GravityWrite offers a script generator tool. Copy the chosen title and access the YouTube Script Creator within GravityWrite. Paste the title into the tool, and you will be provided with a complete script for your video. Feel free to make any necessary edits or additions to customize it to your liking.

Step 4: Creating the Video with Pictory
To bring your script to life, we’ll use a tool called Pictory. This powerful tool enables you to generate a full-fledged video complete with visuals and voiceover using just your script. Get started by signing up for an account. Once logged in, select the option to create a video from a script. Copy your script from GravityWrite and paste it into Pictory. Proceed by selecting a visual style for your video. Choose the style that best matches your preferences. Pictory will then process your video, automatically generating visuals, music, and text based on your script. Take a moment to preview the video to ensure you’re satisfied with the results.

Step 5: Editing the Video
Pictory provides a range of editing tools to fine-tune your video. The script is automatically divided into different scenes, allowing you to make modifications as needed. For example, if you want to change a particular scene’s visuals, simply select the scene and access the visual options. You can choose from the available stock footage or upload your own. Various websites offer free stock footage, such as Pixabay and Pexels. Once you’ve made the necessary adjustments to your video’s visuals, it’s time to consider adding a voiceover.
Step 6: Adding a Voiceover
If you feel that your video would benefit from a voiceover, Pictory provides an option to include an automatic voiceover based on your script. Access the audio settings and click on the voiceover tool. You’ll have access to a variety of voices to choose from. Play around with different options and select the voice that best fits the tone and style of your video. Apply the chosen voice, and your video will now have a professional voiceover to enhance the viewer’s experience.

Step 7: Finalizing and Downloading the Video
With your video fully edited and customized, it’s time to finalize and download it. Once you’re satisfied with the result, click the download button within Pictory. Your video will be processed, and once it’s ready, you can download it to your device. Congratulations! You now have a high-quality video created entirely with the help of AI.
Step 8: Thumbnail Creation with Canva
Before publishing your video, it’s essential to create an eye-catching thumbnail that entices viewers to click and watch. For this purpose, we’ll utilize Canva, a user-friendly graphic design tool. Choose a template that suits your video’s theme and edit it to your liking. Update the default image and text with relevant visuals and attention-grabbing text related to your video. Once you’re satisfied with the thumbnail’s design, download it to your device.

Step 9: Crafting the Description and Tags
To optimize the discoverability of your video on YouTube, it’s crucial to craft a compelling description and select appropriate tags. Return to GravityWrite and utilize their Description and Tags tool. Enter your video’s title, and you’ll be provided with an optimized description, SEO tags, and hashtags. Copy and paste these elements into your YouTube video description area, ensuring that they accurately reflect the content and keywords related to your video.

Step 10: Publishing Your Video
You’ve reached the final step—publishing your video on your YouTube Cashcow Channel. Head to your channel and click on the upload button. Drag and drop the video file you downloaded from Pictory.AI. Enter the video’s title, description, and tags as per the information provided by GravityWrite. To add the thumbnail, select the option to upload a thumbnail image and choose the one you created using Canva. Review all the details, click “Next” multiple times, and when you’re ready, click “Publish.” Your video is now live on your YouTube channel for the world to see.
Review (Unleash the power of AI)
Creating YouTube videos has become more accessible and efficient thanks to AI-powered tools. By utilizing GravityWrite and Pictory, you can generate engaging video ideas, script content, and produce visually appealing videos with minimal effort. Remember to leverage Canva for stunning thumbnail designs and optimize your video’s discoverability with descriptions and tags from GravityWrite. Embrace the power of AI and witness your YouTube Cashcow Channel flourish with engaging, professional-quality content. Start creating and enjoy the journey of captivating your audience with AI-generated videos. Good luck with your million dollar YouTube Cashcow Channel!


